
This pier was the third attempt at a stable platform for visual and photographic observing inside Stone Haven Observatory. The rather massive, rectangular base you see is 3'W x 2'D x 1'H and weighs ~300lbs. It was fitted with 4 bolts epoxied into holes formed while the cement was curing.
The first attempt at a pier was a 6" diameter 1/8" walled steel pipe, filled with sand, that was bolted to the base. Heavy accoustic rubber and washers were installed between the pier and base to reduce oscillations. The wedge that appears on the current pier was attached to the top. The vibrations of this pier were horrific at best, even after filling the pipe with sand and fashioning some "flying gussets" of rope from the wedge to the base. These gussets reduced, but did not eliminate low frequency oscillations on the order of 1-20 Hz that would last for at least 10 seconds.
The second attempt was with sonotube of 8" diameter, to be filled with concrete. In an attempt to pre-second guess myself, I placed a sheet of heavy plastic between the sonotube and the original base, just in case something went wrong. Heavy construction "straps" were used to attach the concrete pier, via the bolts onto the base. After filling the form, 2 pieces of rebar were installed through the sonotube to provide a platform for a shelf of some sort for ep's etc. After the concrete cured, the rebar shelf supports had sagged over night. While attempting to bend and straighten them, the whole shebang came loose from the base, bending the straps and rendering the new pier useless. Thank goodness the scope wasn't on it!
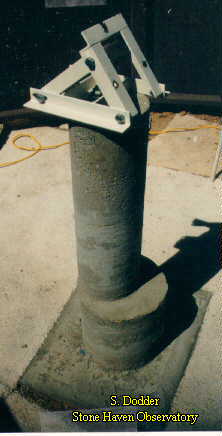
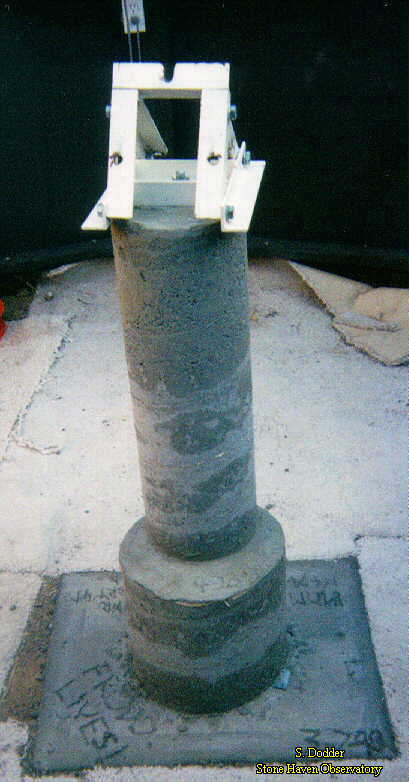
This final attempt is basically the same as the second attempt, with the exception that it works! I had to bite the bullet, and attach the whole kit and kaboodle to the bolts on the base. I used a 12" diameter sonotub and more straps to accomplish this part. I suppose I could have continued this size up to the wedge, but decided to change to an 8" tube, 12" off the ground. I offset the upper portion toward the South side of the observatory, in order to move the ep side of the scope away from the North wall a bit. The upper portion has 2 pieces of 1/2" rebar criss-crossed, extending up to within 3" of the top. The straps at the bottom are secured with heavy nuts, lockwashers and a flat washer. At the top is a hole with a bolt epoxied in place in the same manner as the base bolts. This is called the "Epoxy-tie" system by the manufacturers. The bolt then passes through a hole in the center of the wedge, giving adjustability in Azimuth for polar alignment.
